Saturday 11 January 2014

Can't remember your username or password for your pi?


With one username and one password to rule them all... ok I'll stop with the LoR references.

Big night out? That's alright, big nights out are cool (like bow-ties), but can wreck havoc on the memory cache of your brain. (Wow I'm a nerd, who talks like this?) If you're running Raspbian (Debian Wheezy), on your raspberry pi, then fortune smiles. Follow these instructions and all will be right in the world again.

How to find out your user name

  1. Take the SD card out of your pi and put it into your computer
  2. Open the largest petition (the one with the most bytes, dummy!)
  3. Open the folder named home
  4. Inside the home folder you will find folders that are named with all of the user names of that pi. If there is only one user then there will only be one folder (and it will probably be called pi)

How to reset your password on your pi

  1. Take the SD card out of your pi and put it into your computer
  2. Open the smallest partition (usually the smallest one is called boot)
  3. Open to edit the file named cmdline.txt
  4. At the end of the file add a space and add init=/bin/sh
  5. Save the file and demount the SD card from your computer
  6. Put the SD card back into the pi
  7. Connect the power and wait for it to boot
  8. Type passwd pi and press enter
  9. It will ask you to put in your password twice (so this time make sure it's memorable!)
  10. After this has been accepted you'll then need to power off the pi to remove the SD card again, (not ideal, but the kill command doesn't seem to work)
  11. Put the SD card into your computer again, and open the smallest partition and the file named cmdline.txt (just as you did before in instructions 2 and 3)
  12. Now remove the space and init=/bin/sh (which you had added before. This needs to be removed so that next time you boot up your pi it's not going to start in 'safe mode' again)
  13. Save the file and demount the SD card from your computer
  14. Put the SD card back into the pi
  15. Connect the power and wait for it to boot
And now you're ready to log in with your shiny brand new password ...which hopefully you wrote down on a PostIt and stuck to the back of your pi or can still remember! :)

Tuesday 4 June 2013

Common Commands in Linux - Helpful if You're New to the Pi

How to make it work?


The Most Common Directories of the Raspberry Pi

bin = A place for binary commands which are fundamental for Linux, eg: ls cd top
boot = Contains files needed for start up / booting the system, this includes the kernel, bootloader configuration files and a RAM disk image
dev = Devices, hardware devices such as: soundcard, sd cards mouse keyboard, usb, hard-drive
etc = A place for the system’s configuration files
home = Home. The user’s home directories
lib = Library (all files, kernal modules and libraries can be searched for here)
lost + found = Files that appear in lost+found are typically files that were already unlinked, i.e. their name had been erased, but still opened by some process (so the data hadn’t been erased yet), when the system halted suddenly (due to kernel panic or power failure).
media = Is where external and removable devices such as usb hard-drives, CDs etc are mounted
mnt = Is where devices are temporarily mounted, eg: network file systems
opt = Optimise. A place where extra software, which isn’t handled by the package manager, can be stored
proc = Process. A virtual file system where the kernal can send information to processes
root = Root is the superuser’s home directory (great to boot with if the actual home directory isn’t an option)
run = A standardized file system location, available where users can store runtime information
sbin = Superuser Binary. More advanced binary files for the superuser to use in a terminal
selinux = Secure linux (security stuff, eg: administration)
srv = For data directories to do with the server, eg: FTP, HTTP
sys = System (contains info about the available hardware and kernal tasks)
tmp = Temporary data for files, eg: modifying spreadsheets, are temporarily stored here
usr = User applications / programmes
var = Variable data that can change quite quickly, eg: your own website, because you change it and it has to save some data)


Common Commands


apt-cache search = to search for an application (eg, apt-cache search gimp to search for gimp)
apt-get = used to install and remove applications (specific to Debian systems, must be run under sudo) eg, apt-get install htop
bash and sh are different terminals and terminal interfaces
bs = is the parameter for the dd command, it sets the bit size (ie, how big a chunk of data it copies at a time)
cat = shows you the content of a file
cd = is to enter a directory
chmod = to change rights (who can read / write / execute a file)
dd = is the application which copies an image or a disk down to a disk (basically it copies bits from A to B)
df -h = tells you how much space you have left on your system
du -sch = tells you the size of a catalogue is
exit = to log off your machine
grep = looks for a specific keyword in some data
grep | = looks for a specific keyword in some data that is piped to grep
ifconfig = to see your network configuration
init = used for rebooting your computer or shutting it down (eg, init 0 will shutdown your machine or init 6 will reboot your machine)
ls = listing directories and files, good for figuring out where you are in the system
ls -lah = same as above but with more info given
man = manual (the manual for all the commands eg, man ls to find the manual on the ls command
nano = used to edit files (it’s like notepad)
ping 8.8.8.8 = handy to see if you have an internet connection (8.8.8.8 is Google)
q = quit in an application
sudo = you use it to run commands as the superuser
top = to see what’s running on the system right now
users = allows you to see users who are logged on to the system (local users)
w = gives you system information (eg, uptime, cpu usage ...)
-X = This is called "X Forwarding", it forwards applications with a graphic interface to your machine and here is the code you'd need to type in: ssh pi@192.162.1.123 -X


TAB Twice = to predict the rest of the command or file name you’re writing
UP and DOWN Arrows = used to access your history (good for cutting and pasting commands)


To overwrite your SD card

type disk util list to show the disk devices and show which disk you are going to write to.


Hope this helps, have fun!
- N


The Raspberry Pi - A Piece of Cake


A slice of Pi - this one uses less energy = awesome-o-bot, but
it misses a wired network port and there is only one usb port


First Things First Noobs

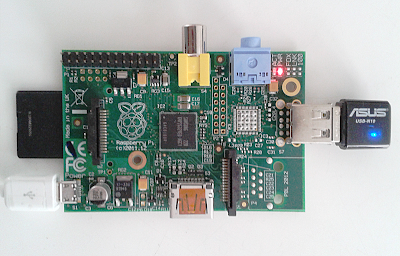
As a minimum you’ve collected a Raspberry Pi, a wifi dongle, a micro usb charger and an SD card* (16G and over gives you plenty of room as the Pi operating system only takes up 1.5GB. If you're housing music, images, and videos then 32GB and up would be a better choice). Realistically you’re also going to need a screen, a keyboard, and the associated cables for them too.
  1. Insert your SD card into your computer, I’m using a Mac so my instructions are going to be based on that
  2. Open up a browser, in Chrome go to “Preferences” > “Downloads”, in Safari, “Settings > “General”, and make sure your computer isn’t going to automatically extract and mount zip files - you'll want to do this manually
  3. Go to www.raspberrypi.org/downloads and download a disk image for your Raspberry Pi (within which is a pre-installed operating system) - there are many, but I chose to use Raspbian “Wheezy” (a varient of Debian Linux and perfect for beginners just like me)


Raspbian Wheezy, note there's a default name and password
- so remember to change it!


  1. Next you need to open up a Terminal, in Mac go to “Utilities” > “Terminal”. Here it gets a little technical (but if I can do it then you can too):
  2. First type  ls  (which is list), and you should see all of the directories and files listed
  3. Type  cd Downloads/ (which will change the directory to Downloads)
  4. Type  openssl sha1  and paste in the downloaded name, eg: 2013-05-25-wheezy-raspbian.zip  The number in the response should match the number which was given on the Raspberry Pi website when you downloaded the zip (this means no corruption), eg: b4375dc9d140e6e48e0406f96dead3601fac6c81. Hopefully the numbers match and you’re ready for the next step. *Note, while this is not absolutely necessary, it's just a good step to take (measure twice, cut once and all that)
  5. Unzip your downloaded zip file
  6. Back to the Terminal now and type  diskutil list  A list of disks on the computer are displayed and you should look for the disk size that matches your SD card (I’m using a 16GB card, and as you can see below it roughly matches that). FYI, the Boot partition has an * next to it


diskutil list

  1. You’ll see that your SD card (disk) has been automatically mounted. We need to undo that by typing  sudo unmount /dev/disk1s1 (if disk1s1 is indeed that SD card (disk), it may be another one on your computer so keep an eye out for that). Note, the first time you run sudo you’ll have to type in your password if that doesn’t work then try diskutil unmount /dev/disk1s1 instead
  2. Now we have to copy the IMG file to the memory card, which means some more code, so type  sudo dd bs=1m if=2013-05-25-wheezy-raspbian.img of=/dev/disk1 and then once that’s finished working, you’re done! 

    Now don’t panic and start pressing buttons because it doesn’t seem like it’s doing anything - it is copying, but as we’re using a simple Terminal program like DD, there’s no fancy graphic of it loading :) You’ll know when it’s done because the Terminal will start responding again

*If you’d prefer to learn by seeing, then try this really well made video tutorial
http://www.youtube.com/watch?v=MwdswCnv3rw

*Note not all SD cards are useable so use this wonderful reference wiki from elinux http://elinux.org/RPi_SD_cards


Forget the User Interface, a Script Kitty Uses a Terminal

Even if you have a dedicated screen and keyboard there’s no point in using the UI (user interface), unless you want to use your Pi for anything other than a server - it takes up too much of the CPUs resources. Just use a terminal instead.


Setting Up the Operating System

Connect everything first before connecting the power to your Pi, eg: insert the SD card, plug in the keyboard and screen, then back away and plug in the power.
The first thing you’re going to see is a lot of code, (this is called Terminal Output). Don’t be freaked out by this, it’s just setting itself up and settling into its new environment.
Once the Terminal Output has finished Matrixing its way across the screen, you’ll see the Blue Screen (but thankfully not the Blue Screen of Death). So what you'll want to do now is work your way through this menu.


The blue screen of yay :)

  1. Don’t worry about info, uninteresting, go instead to the next option down on the list expand_rootfs You want to hit “Enter” that it’s ok to do this. Doing so will expand the root partition to fully use the SD card, a good thing because now you have access to the full (in my case), 16GB of the SD. Always better to do this sooner than later
  2. overscan is next on the list. Choose to enable this if you've connected a screen and you’re worried about the black border, or opposite: can't see the entire screen, BUT, as we’re all going to use a Terminal on our computers, we don’t really have to bother with that nonsense right?
  3. configure_keyboard is the next one down, scroll through the options and choose your keyboard type. Good to go back to later if you have any problems with your keyboard
  4. change_pass Probably one of the most important items on this list. Enter a new password to make the Pi yours and not everybody else's. The default name is: Pi and the default password is: Raspberry, so prolly a good idea not to use those
  5. change_locale ensures that your Pi supports the characters in your language. Whatever your language and locale, I recommend choosing UTF-8 as it seems that is becoming more the standard now. en_GB.UTF-8 UTF-8 (British English) is the default ...
  6. change_timezone Choose your continent, then city then the Pi's clock will be correct
  7. memory_split is just for tuning, eg: you could split it so that all of the memory goes to the server (but then you could never have the option of booting up in the graphic interface as there’d be no memory left for that). Here I think it’s best to leave it alone - just back away
  8. overclock Probably something you don’t want to mess with as some memory cards find themselves corrupted in the process. A list of cards which will and won’t work can be found here http://elinux.org/RPi_SD_cards
  9. ssh You really want to enable the ssh server as it makes it possible for you to control your Pi from your computer
  10. boot_behaviour If you’re a badass script kitty then you won’t choose this option as you will be using a Terminal instead, BUT if you feel more comfortable with a graphic interface, then you’ll probably want to enable this option, (and pour yourself a nice cup of Horlicks while you're at it)
  11. update Last on the list, hit “Enter” to update. Even though you’ve only just installed it, there could already be an update, and hell you’re here anyways. *Note this will only work at this stage with a wired version. If you're using a wireless version you'll have to come back to this later
  12. When you’re done playing around with the menu, click “Finish” *Note you can always run the Raspberry Pi Configuration(?) table (fancy name for the menu we've just been working through), by running sudo raspi-config in a Terminal
Now you’ll see pi@raspberrypi ~$  (pi is the default username at your Raspberry Pi, also the default name given. You can change this, but why bother? it's the password you need to concentrate on), and you’re back to the Terminal baby :D


But wait! I should give you options, options are good, options = freedom. If you want to continue on in the Terminal then type

sudo nano /etc/network/interfaces

auto lo

iface lo inet loopback

iface eth0 inet dhcp

allow-hotplug wlan0

auto wlan0

iface wlan0 inet dhcp

wpa-ssid (then type in the name of your wifi)

wpa-psk (then type in the code for your wifi)

Now press CMD X (or CTRL X if you're not on a Mac), then y for "yes" to save. Next, restart the network by typing sudo service networking restart

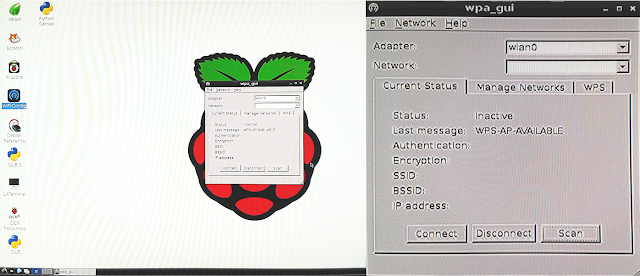
...Or maybe you just like graphics, bully for you. First you'll need to log into that graphic interface to set up your wifi, so type startx and hit “Enter” then click on "WIFI Config" and click on “Scan”


Graphic interface of the Pi (left), and configuring your wifi (right)

Once you’ve found your wifi network click on it, click on "Connect" and then you’re done. Easy. Click “Close” and then log out, (bottom right of the screen). And that’s it, that's all you really need the graphic interface for. Now to ssh into your Pi...


To access your Pi from your computer (if don’t want to have a dedicated keyboard and screen set-up), you’ll have to ssh into it. To do this you’re going to need to know your Pi’s ip address. Type ifconfig in the Terminal to get a number similar to 192.168.x.x in construction. In the Terminal on your computer type ssh pi@192.168.x.x for example, hit "Enter" and type in your password and your in!

Remember this is a Pi not a painting - if you royally f*#k it up, no worries, just follow this tutorial again

Well, well, now you've become all techy and have a Raspberry Pi you can actually use, so it might be a good idea to think about what you want to do with it - which is possibly the hardest part of owning a Pi. For some inspiration check out my next post: "Own a Pi? OwnCloud"

Happy Geekend (even though it's now Tuesday, I did start this post on the weekend),
- N

For more inspiration check out a sweet blog I proofread: http://hyggeit.blogspot.dk/